I'm also linking up with the Reading in the Wild by Donalyn Miller book study today. Since this is the first time I'm linking up, I'm going to share my thoughts and reflections on all of chapter 1. To see the schedule and read the posts from last week on the first half of chapter 1, see the book study landing and information page here. It's hosted by Catherine at
Showing posts with label Management. Show all posts
Thursday, June 26, 2014
Reading in the Wild Summer Book Study Chapter 1
I'm also linking up with the Reading in the Wild by Donalyn Miller book study today. Since this is the first time I'm linking up, I'm going to share my thoughts and reflections on all of chapter 1. To see the schedule and read the posts from last week on the first half of chapter 1, see the book study landing and information page here. It's hosted by Catherine at
Wednesday, June 25, 2014
Small Group Reading: Activities and Structure
Here's post 2 in my mini-series on the activities during small group reading time. My last post briefly described how I get my students started and slowly introduce one activity at a time. This one is focused on introducing each activity and my structure. Each of the activities will get their own post with details on what I do for each in the upcoming posts.
I have five "must-do" activities that students rotate through. They do one each day. Here are the five. Those of you familiar with Daily 5 might see some similarities here, but there are many differences as well.
1- Guided Reading: This groups job is to meet with me first thing. I do a traditional guided reading lesson with this group.
2 - Deeper Reading: This group meets with me second. This is where I concentrate on what many are calling "close reading."
3 - Fluency: I am a strong believer in the correlation of fluency and comprehension. Students who can read fluently spend less time decoding and can therefore spend more time comprehending.
4 - Listening: Like fluency, I feel strongly that listening to a book read aloud is so helpful to students; it builds fluency and comprehension. I think it's just as important in the upper grades as in the lower grades.
5 - Genre Activities: This is where I'm able to get students reading and responding in various ways. It's also where I put in some reading tasks cards and activities.
Be sure to keep following this series for my in-depth posts on each of these activities.
The Structure
I have 5 reading groups. With my large class size, 33 last year, I may have up to 8 students in a reading group. I like to keep my lower groups as small as possible, so the larger ones are always my higher level groups. Last year, I was able to have no more than 7 in a group. Sometimes, I have a super low student that needs his/her own group. I meet with this student for a few minutes each day between groups and assign him/her activities custom fit for his/her needs.
Sorry for the terrible picture. I snapped it fast as I was cleaning up my room at the end of the year.
I print the names of the students in each group on a half-size sheet of paper and mount to a card stock with a magnet on the back. I post labels for the 5 rotations on the board. I hang the group card under the activity they are assigned for that day. That's the activity they start with, except for the deeper reading group. The deeper reading group might start by reading the passage we'll be looking at together or they might just start on their literature circle response. Guided reading starts at my table, and all the other groups go right to their "jobs". They must complete their assigned task first, before anything else.
A closer look.
Each morning, I just rotate the groups in a clockwise fashion. Directly under the space for the group card, I write in directions for students. I direct the pages for the listening group, give the story and page numbers for the fluency group, and any directions to the deeper reading group. For the genre group, I post a vertical strip of numbers. Students do the corresponding numbered genre activity. I change the number strip at the beginning of each new rotation.
How do you organize and structure students during your small group reading time?
Tuesday, April 15, 2014
Classroom Jobs
Every student in my class has a classroom job each week. I really like that because I really try to emphasize the idea of community in my classroom and when we are all part of a community, we all have responsibilities. I used these cute chalkboard pocket images from Michelle of the3amteacher. I imported the images into a document and then overlaid them with the text for each job. After printing and laminating, I used a bead of hot glue around three edges to secure them to this nice large cupboard front that I have in my classroom. Now they function as pockets.
Each student in my class is assigned a number. I print several label pages with just student numbers on them to use throughout the year. (See my recent post on using labels in the classroom here.) I attached a numbered labels to the top of index cards and wrote in the student names. The cards fit perfectly in the pockets to designate what job each student is assigned to.
I try to switch the jobs weekly, but let's be honest, it often is 2-3 weeks before they get switched. I give more time so students get to know their jobs. It would also be a super extra hassle to try to change jobs daily. I just rotate them in order. I do have to do some fudging for the jobs like "girls bathroom pass" and "boys bathroom pass".
Each student in my class is assigned a number. I print several label pages with just student numbers on them to use throughout the year. (See my recent post on using labels in the classroom here.) I attached a numbered labels to the top of index cards and wrote in the student names. The cards fit perfectly in the pockets to designate what job each student is assigned to.
I try to switch the jobs weekly, but let's be honest, it often is 2-3 weeks before they get switched. I give more time so students get to know their jobs. It would also be a super extra hassle to try to change jobs daily. I just rotate them in order. I do have to do some fudging for the jobs like "girls bathroom pass" and "boys bathroom pass".
You can grab a list of the jobs I use here.
How do you manage student jobs in your classroom? We'd love to hear about it in the comments below.
Wednesday, August 7, 2013
Classroom Management Idea ~ Using the 50 States
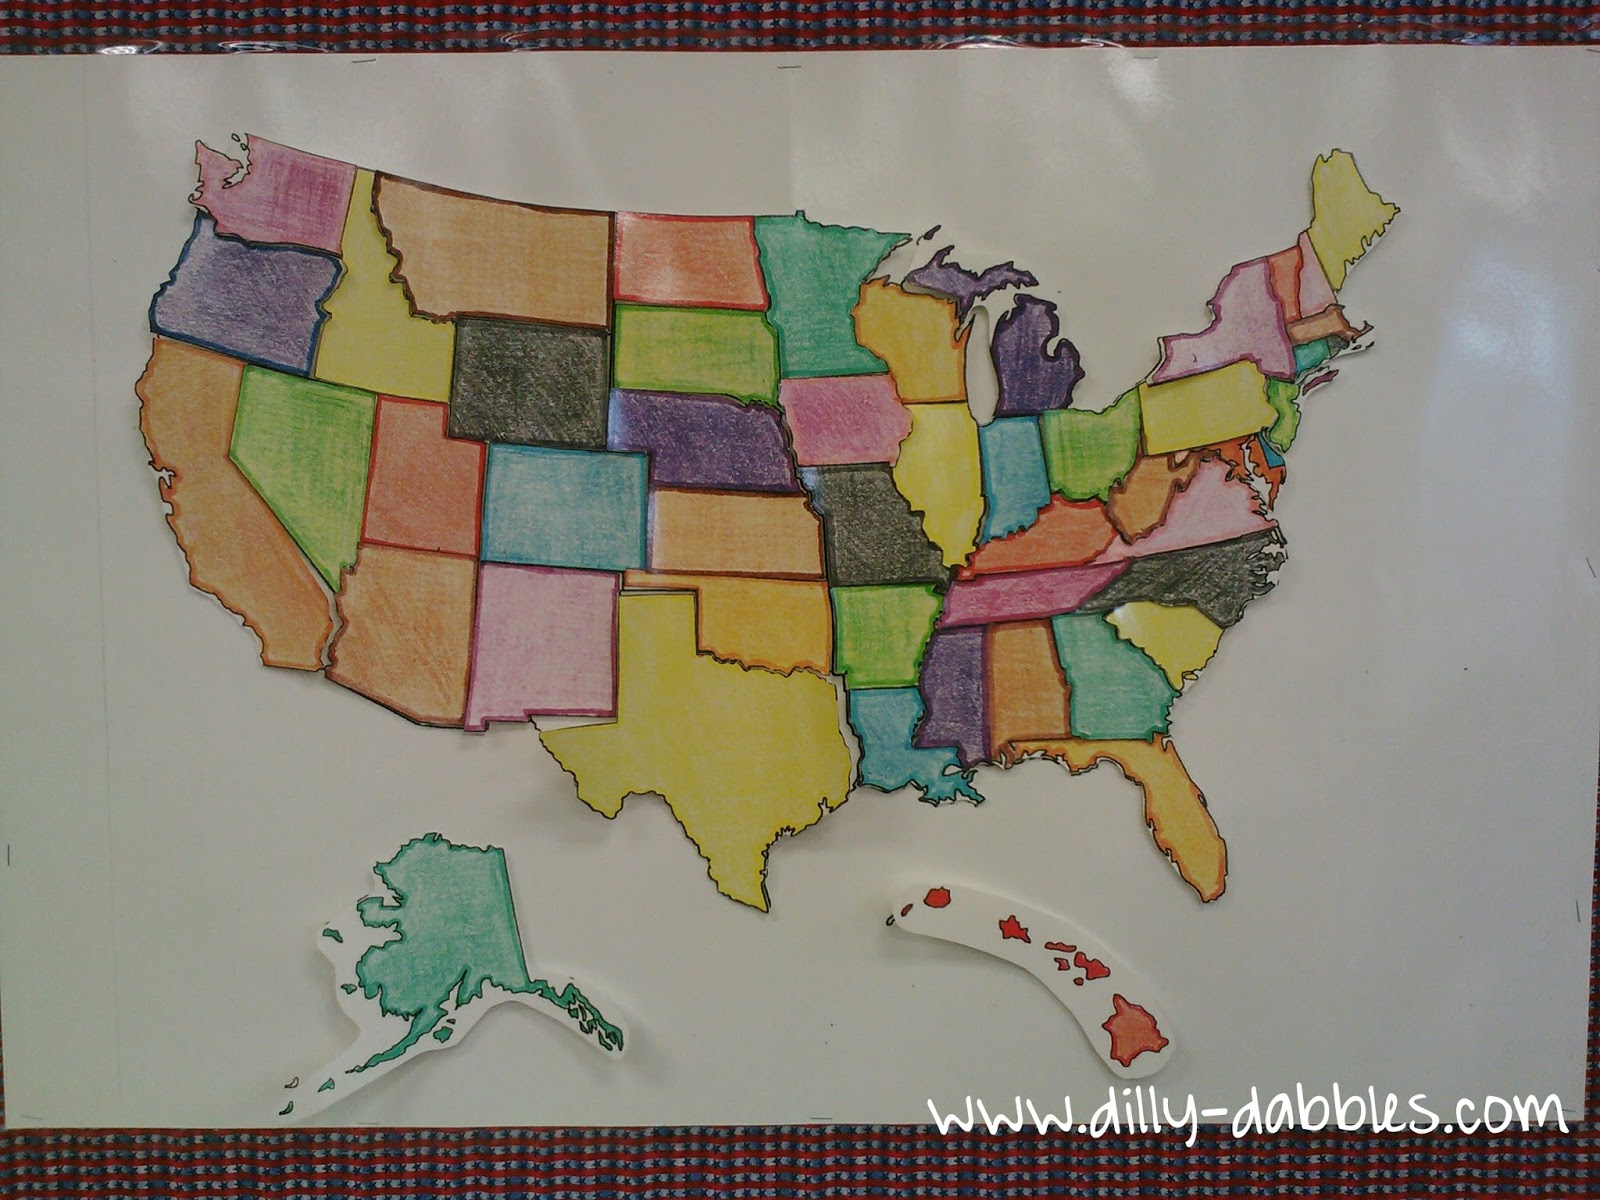
Our S.S. curriculum is U.S. history and geography, so this ties in very well. Each time the class receives a top score from their specialists teacher, they may put a state up on the map. They may also receive a state for working quietly and cooperatively during an independent work time or for great behavior at an assembly or in the hall. When all the states have been placed on the map, the class receives a prize.
My district has a very nice in-house printing facility and I just sent them a standard 8.5x11 states map and they blew it up to poster size and laminated it for me. I also colored the same map image, sent it in and received a nice colored, laminated poster from them. So, I didn't have to color in all that large space. I cut out the colored map. Then I placed sticky back Velcro on the outline map. I put the opposing Velcro side on top so the sticky side was out. Then I lined up the colored piece and pressed it on. This way, the Velcro pieces line up and the colored piece is in the right spot when it is attached.
Making sure the Velcro is lined up.
I'm starting my class off with the states I have lived in to give them a head start at the beginning of the year.
All the pieces are kept in a basket on the desk I have under the B.board. The picture below shows the map on the board and the desk underneath. Our class expectations will go on the wall to the right and the prize will be posted above the map.
For the prizes, I do several things. I sometimes make it a mystery and don't tell the students what it is until they win it. This usually works best after students have had a few prizes so they know what types of things might be expected. Often times, we choose as a class. Tables work together to come up with one or two ideas, we share them out as a class and then vote on them. My parameters are that they usually need to be free and something that can be done at school. Some of the things we've done include:
Bring your own game - Students bring their own board games or cards games and play for about an hour one afternoon.
Bring your electronic device - Students can bring their electronic gaming systems or music devices to play/listen to.
Play Kickball - My students usually love kickball and enjoy having an afternoon out playing it.
Read in the Gym - Bring blankets and pillows and spread out all over the gym to read
Watch a movie - We are able to watch anything with a G rating or our media center also has a good selection of movies. I usually try to tie this in with content or watching a movie based on a book we have read.
Extra recess - Adding in a morning recess one day. We usually just have lunch time and a 15 minute afternoon recess.
Food Parties - I usually save the food parties for my mystery incentives:
Root-beer Float Party
Hot Chocolate and a Story or Movie Party
Pizza Party
Soda Pop or Popsicle Party (each child receives a can of Shasta soda or a Popsicle and consumes it outside)
**For any of the incentives, be sure to set parameters, especially when students are bringing items from home.**
What is your whole-class management/incentive system?
Sunday, August 4, 2013
Best Pencil Sharpener Ever and a Freebie
I took a little break last week as I taught some professional development for the new teachers to our district. I get to do it again this coming week. I really love the mentoring aspect of teaching. Helping new teachers is so exciting and I love all the new things I learn from them as well!
I polished up my back to school forms and information packets last week. One of the things I got ready is an instruction page for the open house my school is having the day before school starts. I wanted students to look around the room and have the items in their desk ready for the first day. (A post sharing these forms is coming later in the week.)
One of the things I decided to have them do is to sharpen their own pencils so they are all ready for the first day. I could have spent quite a bit of time sharpening all the pencils, but 5th graders are fully capable of such a thing, especially now that I have the AMAZING pencil sharpener from Classroom Friendly Supplies. It really is the best sharpener I have ever used! It's so easy that I'm sure my fifth graders can use it without breaking it. My two year old can do it for heavens sake! If students have a chance to use it the day before school, the novelty of it will have worn off a bit and they'll each know how to use it appropriately using it with their parents so I don't have to take class time teaching that procedure. Read to the end of the post for a free instruction page.
So, here is the sharpener all set up on the counter in my classroom. The sink is just to the left there.
I polished up my back to school forms and information packets last week. One of the things I got ready is an instruction page for the open house my school is having the day before school starts. I wanted students to look around the room and have the items in their desk ready for the first day. (A post sharing these forms is coming later in the week.)
One of the things I decided to have them do is to sharpen their own pencils so they are all ready for the first day. I could have spent quite a bit of time sharpening all the pencils, but 5th graders are fully capable of such a thing, especially now that I have the AMAZING pencil sharpener from Classroom Friendly Supplies. It really is the best sharpener I have ever used! It's so easy that I'm sure my fifth graders can use it without breaking it. My two year old can do it for heavens sake! If students have a chance to use it the day before school, the novelty of it will have worn off a bit and they'll each know how to use it appropriately using it with their parents so I don't have to take class time teaching that procedure. Read to the end of the post for a free instruction page.
So, here is the sharpener all set up on the counter in my classroom. The sink is just to the left there.
It grips nicely to the edge there and has quite a range of adjustability to fit just about any counter thickness.
Just pull the front plate out then grasp the two knobs at the top and squeeze together. It's so easy I did it one-handed so I could take a picture!
Then turn the handle until you no longer feel any resistance.
Then you have the sharpest pencil ever with no waste or pencil eating like an electric sharpener might do.
As you probably saw in the first pictures, I do have an electric sharpener provided by the school. They break easily, the kids like to stick their pencils in and see how small they can get them and for some reason they also like to stick crayons, erasers and pencils in backwards! So pencil sharpening had become a teacher only job in my classroom. Thus, the reason for the two baskets you also saw.
Here's a comparison of the un-sharpened pencil, electric sharpened pencil and the manual sharpened pencil:
Incredible difference!!
I'm planning to get another sharpener soon so I have two in my room. I'm thinking that my procedures for pencil sharpening will be that students can sharpen their own pencils anytime during work time. If they're in the middle of something, they can put them in the dull basket and a class job will be "pencil sharpener" and sharpen when they are available and place in the sharp basket to be picked up. Each student is starting with 3 pencils, so they should have an extra or two on hand in an emergency. I also labeled each pencil with the students' class numbers to they can keep track of them and be responsible for their pencils. They can also grab them from the sharpened box and keep their own. I just used a brand new sharpie marker so it had a nice tip on it to write the numbers small on the pencils.
Get with some of your colleagues and order a set of sharpeners together for the best price. Be sure to head over to Classroom Friendly Supplies to see all the color selections. You can also buy replacement parts if you need them and not have to purchase a completely new sharpener, especially if the blade gets dull or gummed up with a crayon.
Now that you've made it through my ramblings about this great classroom tool, you can grab the instruction sheet I am posting on the wall next to the sharpener for FREE! Just click here to grab it.
What classroom procedures do you have in place for pencils?
Monday, March 19, 2012
Class Connect
Have you heard about this brand new sharing and storage format for teachers? It's like pinterest and dropbox rolled into one. It's brand new, but growing quickly. You can sign up for FREE here and join other teachers who are sharing their ideas, lessons, videos and more all in one place. You can post your own too. It looks like you can choose what you share publicly for others to use and what you just store for yourself to keep private. I'm still exploring it myself, but you can connect with me at http://www.classconnect.com/DillyDabbles.
Erin Klein of Kleinspiration has a detailed post you can read also here.
Sunday, March 18, 2012
Organizing Books Students are Reading
Last week I posted about organizing my classroom library. Now it's time for how I organize the books when they are out of the classroom library and being read by students. Again, I struggled with this one for a few years too. Books in the desks get mashed, ripped and bent. Then I allowed students to have one book kept on top of the desk in the corner; those were always in the way. This also didn't give students the opportunity to read very many books. Then I tried book boxes, but they were cumbersome to store and difficult for students to take with them around the classroom or to other places. So, I tried bags. Books stay healthy, students can have several on hand to read, they can take them anywhere and they are easy to store. Solution to all of my previous problems. So, this is how I do it. I purchased these tote bags in packs at Walmart. I think they came 3 or 4 to a set. I have sets in brown tones and bright tones. The various colors make it easier for students to spot their bag. I took out all the pink ones because I numbered the bags and didn't want a boy to end up with a pink one if his number happened to match a pink bag. So each student, who has a class number, belongs to their corresponding bag. I'm lucky enough to have a few extra cubbies, and the bags store perfectly there. I've labeled each cubbie with the bag numbers that belong there.
Last year, I was in a different room and I tried the command hooks, but I needed to have ones that
would hold more weight. If you don't have cubbies, I would suggest perhaps having a handy person make a board of hooks that could be mounted on your wall. Students keep 8-10 books in their bags. They can change them in the morning before school starts or any time they finish work early. Students grab their bags and quickly go to reading spots for silent or partner reading, they get them when they finish work early or during tests. We can take them with us to upper grade buddies or to the computer lab. Additionally, within their tote bag, I added a smaller bag. This bag is for guided reading books. I wanted students to have access to the books I gave them during groups so they could reread them. I didn't want them to get mixed up with the other books they had. This has also worked out great. In the smaller bag, they keep their reading journal along with the books from group.
This bit of organization has helped my student have access to books more often and has kept my books in good shape. How do you organize the books your students read or how do you see implementing these ideas? I'd love to hear about it in the comments below!
Last year, I was in a different room and I tried the command hooks, but I needed to have ones thatwould hold more weight. If you don't have cubbies, I would suggest perhaps having a handy person make a board of hooks that could be mounted on your wall. Students keep 8-10 books in their bags. They can change them in the morning before school starts or any time they finish work early. Students grab their bags and quickly go to reading spots for silent or partner reading, they get them when they finish work early or during tests. We can take them with us to upper grade buddies or to the computer lab. Additionally, within their tote bag, I added a smaller bag. This bag is for guided reading books. I wanted students to have access to the books I gave them during groups so they could reread them. I didn't want them to get mixed up with the other books they had. This has also worked out great. In the smaller bag, they keep their reading journal along with the books from group.
This bit of organization has helped my student have access to books more often and has kept my books in good shape. How do you organize the books your students read or how do you see implementing these ideas? I'd love to hear about it in the comments below!
Monday, March 12, 2012
Class Library
Organizing my Class Library has been my nemesis since I began teaching. Finding just the way to organize the books so that they stayed nice and were able to be found and easy to put away always eluded me...until last summer. I had tried genre tubs, alphabetizing (silly new teacher thoughts) and color coding. None of them brought me the desired results. Then, I heard the idea of numbering my books. Grouping them together in whatever way worked for my collection and then numbering the bins and all the books that belonged in that bin with the same number. Now why did it take me so long to discover this??! It has worked wonderfully this year. Students can find numbered bins easily and they know exactly where the book belongs when they are done with it. I have posted a list of the numbers and what each contains on the sides of the bookshelves. (See below for access to this FREEBIE!)
This allows students to find what they are looking for and go right to the numbered bin to find a book. I chose to organize in a combined fashion. I have a section that is organized by reading levels, some by genre, some by interest and also by series or author. I got these cardboard organizers from my district warehouse. You can get similar ones on Amazon
These bins that are on top of my shelves, along with the others at the bottom of the second shelf, were acquired from my local dollar store. They have worked great for chapter books and some of the smaller books. You can see that they don't always stay neat and tidy, but they do get to the right spot. Below is a preview and a link to my master bin list which I'm sharing with all of you! It's an Excel file. I did have to take the graphics I had off (copyright reasons) because I wanted you to be able to easily edit it for yourself. Add in your own art or Office clip art to cutesy it up! Look for my next post about how students keep the books they are reading.
How do you organize your classroom library? I'd love to hear about it in the comments below.
Class Library Bin Master List by Dilly Dabbles
Friday, February 24, 2012
Tattling Troubles
I think there's really some kind of dark magic that happens at the end of January every year. Something in the air changes... and so do my students. We were all getting along pretty good until a few weeks ago. Then, the tattling bug hit full force. You all know that specific whine...Mmmrsss. Greeeen? or TEEEAAACHERRRRR! which is followed by a most important tattle. My head was aching and students were getting less and less work done because they were so busy being nosey. Well, I had to solve this persistent problem. One of my colleagues suggested that I have the students tell the President. Light-bulb!! So, that is exactly what I set up. I set an empty dishwasher tablet container in a basket with a stack of paper slips. I posted a picture of the U.S. President along with a list of tattling rules. Voila! No more tattling to me! Of course the excitement of this new avenue to tattle was a little disruptive at first as they all ran to "Tell the President", but it is slowly waning and the two or three that really have to tell everything are the only ones who really post any more. When I get that whine, I just say, "Is this something for the President?" and they do an about face. I read through the tattles each Friday and address concerns with the class. They feel like they've been heard and we can discuss ongoing problems as a class and not fifty times throughout the week to everyone individually as they tattle. Here's a FREEBIE of the rules and picture of the President that I posted. I'd love to hear about your tales of tattling in the comments below!
Subscribe to:
Posts (Atom)


+copy.jpg)