Showing posts with label classroom setup. Show all posts

Monday, August 10, 2015

Getting Ready for Back To School - 1


It's the season when school begins to start all over the U.S.  Teachers are back in classrooms getting ready for students, students are awaiting teacher assignments and picking out first day outfits.  Some have already started and are in a week or even two and others have a month yet before returning.  I begin this Thursday, with students' first day on the following Wednesday, August 19.  I've been in my room here and there over the last two weeks to get things organized and set up.  This will leave me with my PD days to plan my lessons and not stress about room readiness.  I feel lucky that of the 4 days of PD that my district gave us this year, only 2 of them contain meetings.  I will have all of Friday to plan, half a day on Monday and half a day on Tuesday.  Our meet the teacher time will be Tuesday afternoon, so everything must be ready by 1:00 pm Tuesday!

I'm planning my next few posts to introduce you to my classroom and how I've prepared for students.  First tip, make sure you're room is welcoming on the outside, not just the inside.  I used the Ecostatic cling white board sheet from shoplet.com on my classroom door to help welcome students to my classroom.  My 11 year old daughter was excited to decorated it for me!  I love that it clings to my door with static electricity, so does my custodian!  Tapes can take the varnish off the doors so it's always a trick as to how to post something welcoming up on the door.  This was perfect.  I will probably still add some bulletin board border around the sheet to spruce it up a bit.  I'll be placing the student desk name tags around the sign for meet the teacher.  Students will take their tag off the door and choose their desk and attach the tag to the one they choose.  We switch desks at the beginning of each month, so they'll only have their chosen seats for the first two weeks.  This time allows me to get to know them and better understand where to seat them in September. It also gives them choice and ownership right off the bat. 

It is a little difficult to smooth out, you can still see a few bubbles there.  It's easy to clean off if you do so right away, but if you leave the dry erase marker on for more than a few hours, you'll need to use the specialty white board cleaner spray to get the marker off.  These will post on any smooth surface, so consider turning your cupboard fronts into whiteboards and windows and doors. These would work great for around the room writing or group work.  They're reusable and you wouldn't have to use and throw away large chart pages that are sometimes very expensive.  

Ecostatic also makes the cling sheets in smaller notecard sizes.  I posted one up on my fridge for reminders.  They might come in handy at school near your desk, but I couldn't really think of a reason I'd use the smaller size at school in place of regular sticky notes.  Perhaps you can think of some ways you might use them. 

Whatever you decide to use to decorate the outside of your room, it's great to have some way to welcome students and families into their new classroom.  They'll be spending a lot of time there, and they want to know it's an inviting and comfortable place to be.  

How do you decorate the outside of your room to welcome students and families? 


Note: shoplet.com sent me the Ecostatic Beginner Kit free to review.  Opinions and my use of the product are my own from my experience with the product.  Links in this post are not affiliate, they only direct to the shoplet.com website. 

Saturday, May 17, 2014

Easily Labeling and Organizing Classroom Books

My last Bright Ideas post was all about using labels in the classroom with a focus on using the clear, plastic coated labels for labeling your room.  Since they are plastic, they don't leave behind a sticky, papery mess when you remove them from your cupboards and shelves.  Today, I'm sharing how I use labels for organizing my classroom books.


I have a few different versions I use, pictured below, but basically I print out a few sheets of each and have them ready for when my book orders arrive.  I format the labels so that each label can be cut in half to get two book labels from each standard size mailing label.  Hopefully you can see how they are cut in the pictures.


For books going into my class library, the labels are just printed with my name.  I cut down the rows of labels, leaving the top in tact so they don't all fall apart.  When it's time to label a book, I simply remove a square, attach to the cover of the book and then refer to my library topic list.  I write in the category number that corresponds to the book genre.  For example, all of my realistic fiction books are numbered with 11.


For books going into my small group collections for guided reading and literature circles, I have labels that include my name, indication that it is a small group set, and then numbers stating that particular book number and how many are in the set.  I usually get 10 books of a title for my small group sets.  I have anywhere from 6-8 in these groups usually.  That leaves one that I designate as the teacher book for me to record my notes and write in and an extra for just in case.


Finally, I label my class set novels.  These are done in a similar fashion as my small group sets, just labled as a class set.  I like to have 35 for a class set.  My largest class size has been 33, this last year, so 35 gives everyone their own copy, ans extra and a teacher copy.  If, heaven forbid, I should have a class size larger than 34, some would just have to share.

With each book numbered for the small group and class sets of books, I can assign each student a book.  This helps with responsibility placed on the students to respect the books and helps me know who to charge or give a consequence to for damage to books.

I hope this will be helpful to you in organizing your own book collections.  I'd love to hear about how you organize your books or what other ideas this post may have spurred for you in the comments section below.

If you enjoyed this idea, please consider following me on Twitter or Facebook or Bloglovin' to keep updated on the latest from Dilly Dabbles.


Be sure to check out the many other "Bright Ideas" from other participating bloggers by clicking on the linky images below:


 photo Signature_edited-3_zps050aaea1.png

Tuesday, April 15, 2014

Classroom Jobs

Every student in my class has a classroom job each week.  I really like that because I really try to emphasize the idea of community in my classroom and when we are all part of a community, we all have responsibilities.  I used these cute chalkboard pocket images from Michelle of the3amteacher.  I imported the images into a document and then overlaid them with the text for each job.  After printing and laminating, I used a bead of hot glue around three edges to secure them to this nice large cupboard front that I have in my classroom.  Now they function as pockets.

Each student in my class is assigned a number.  I print several label pages with just student numbers on them to use throughout the year.  (See my recent post on using labels in the classroom here.) I attached a numbered labels to the top of index cards and wrote in the student names.  The cards fit perfectly in the pockets to designate what job each student is assigned to.

I try to switch the jobs weekly, but let's be honest, it often is 2-3 weeks before they get switched.  I give more time so students get to know their jobs.  It would also be a super extra hassle to try to change jobs daily.  I just rotate them in order.  I do have to do some fudging for the jobs like "girls bathroom pass" and "boys bathroom pass".


You can grab a list of the jobs I use here. 

How do you manage student jobs in your classroom? We'd love to hear about it in the comments below. 


 photo Signature_edited-3_zps050aaea1.png

Sunday, November 10, 2013

Utilizing Carpeted Walls in the Classroom.

Wow! It really has been since before school started that I last blogged.  Here I was thinking it had only been a month or so...oh my!  I guess that's an indicator of how crazy busy school and motherhood has kept me.  I'm hoping I can get back to posting at least once a week (more would be great) so here we go:

I have carpeted walls on two of the walls in my classroom.  My third wall is mostly cupboards and cubbies and the fourth wall is wallpapered, but taken up mostly by my white board and two smaller bulletin boards.  You can see the 360 tour of my classroom before school started, about two posts ago.

I wanted to utilize the carpeted walls, but didn't want to pay a fortune for Velcro, and I knew that Velcro wouldn't hold up everything I was hoping to hang.  I remembered the clips my husband used years ago when he worked in a cubicle to hang things up on his "walls" and realized that those would probably be perfect for my carpeted walls.  I did a little searching and discovered that these cubicle hooks not only came in hooks, but also clips.  Both would be perfect to fit my needs for the carpet walls.

Using the hooks, I've been able to hang up a pocket chart and also hang up my mp3 players from lanyards.


I've been able to clip these dry erase pockets behind my reading table to easily post literature circle assignments and I've also used the hooks to hang tote bags for my center activities on the walls.  (Pictures of this will come in my posts about my reading block.)


These clips and hooks would also work well on bulletin boards.  

If you have carpeted walls and these hooks and clips would be helpful to you, you can find them on Amazon by clicking either picture below.  They are also available at Staples and perhaps any other office store near you. 


How do you hang your posters, pocket charts, etc. on your classroom walls?


 photo Signature_edited-3_zps050aaea1.png

Tuesday, August 13, 2013

Classroom Tour - It's Almost Done

I've been posting a few pictures as I've been working on my classroom over the last few weeks.  Well, it's nearly done.  Just a few minor things to do, but if they don't get done before the first day, no one will know (except me). I'll do some posts about some of the aspects more in depth next week.

Classroom View.  Everything's on the desks, ready to go. 

Starting at the door.  Class jobs, attendance and hall passes. See my post about the attendance board here

Other side of the door.  The crate is for turning in work, a wall calendar and community supplies.  Students receive a set of colored pencils, 3 regular pencils, 3 cap erasers, an expo marker and a felt eraser to keep in their pencil pouch a their desk.  Glue, scissors, markers and crayons are in the community totes.  Lined paper and rulers are on top of the shelf. 


White board and doc. camera.  Still need headings for the vocabulary and spelling columns on the board. The divider is black Washi tape.  Same thing I used on the attendance board. The left side of the board has my schedule and class behavior system.  The post about the map is here


Guided reading corner.  A kidney table sits just outside the picture.  My IKEA shelf for organization and dry-erase pockets to write each groups reading assignments on. 

My desk.  A few odds and ends still out to take care of.  I'm loving my new teacher tool-box (under the monitor) and the lined sticky note pad stuck to the closet side.  The shoe organizer is holding calculators.

Class library organized with labels from Ladybugs Teacher Files.  Boxes on top are the students book boxes with reading response journals, guided reading books and class library books to be housed in them. There's another shelf on the backside.

My "Helper"

Reading texts ready to grab when needed.  Students have a larger set of cubbies for their coats and backpacks.

On their desks: Binder, shower board dry erase board, student planner, two spiral notebooks (one for math and one for science, reading is kept in their book boxes.), pencil pouch. 
On each item, except the white board, I put a label with a number corresponding to the students' class number.  During open house the day before the first day of school, I ask students to write their names in the space to the right of the number.  This helps everyone keep track of items more easily.  

Now to take the rest of this week to plan curriculum.  I report back to school for contract on Monday, with students starting on Thursday.  Yikes!

How's your classroom preparation coming?  Share with us in the comments. 


 photo Signature_edited-3_zps050aaea1.png

Wednesday, August 7, 2013

Classroom Management Idea ~ Using the 50 States


I like to do incentives/rewards for classroom behavior that are both individual and group.  My team has been doing this method of class incentives for a long time, dating back to when I was on the team in 2005.  I'm returning to the 5th grade team this fall and they are still using this.  So, it must be good. ;)

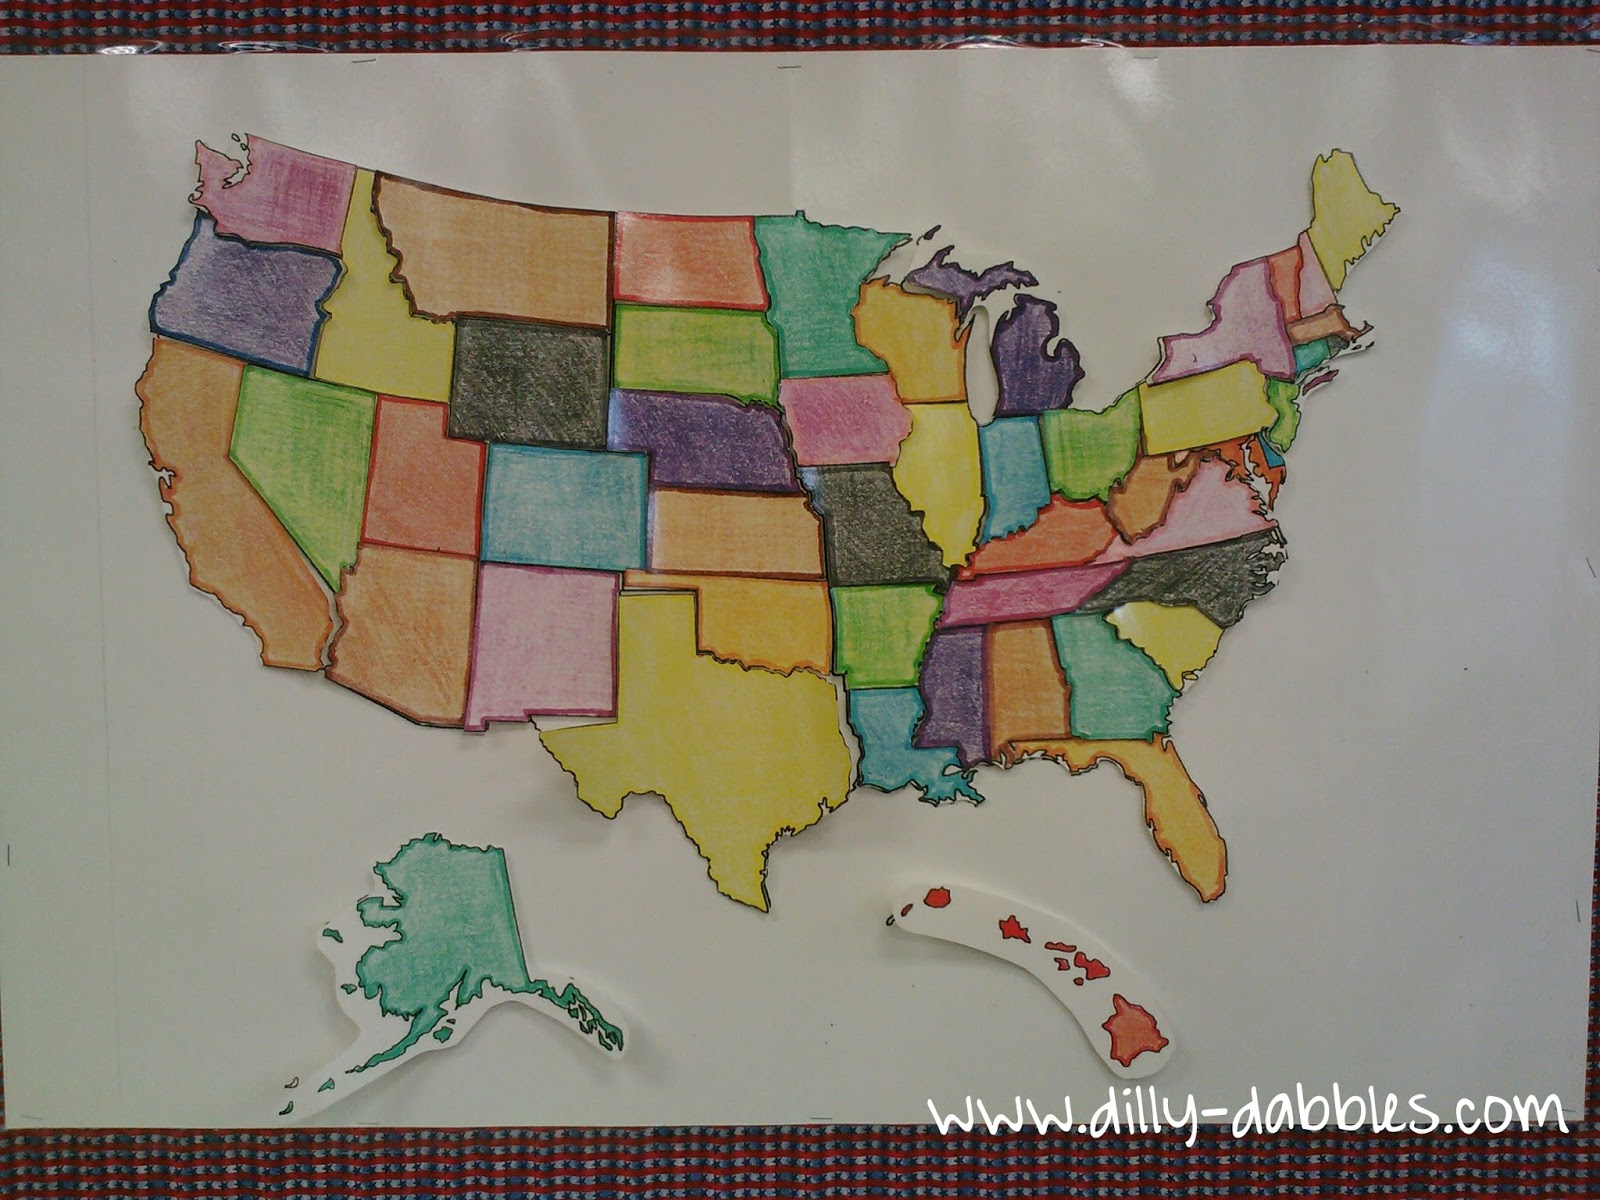
Our S.S. curriculum is U.S. history and geography, so this ties in very well.  Each time the class receives a top score from their specialists teacher, they may put a state up on the map. They may also receive a state for working quietly and cooperatively during an independent work time or for great behavior at an assembly or in the hall.  When all the states have been placed on the map, the class receives a prize.

My district has a very nice in-house printing facility and I just sent them a standard 8.5x11 states map and they blew it up to poster size and laminated it for me.  I also colored the same map image, sent it in and received a nice colored, laminated poster from them.  So, I didn't have to color in all that large space.  I cut out the colored map.  Then I placed sticky back Velcro on the outline map.  I put the opposing Velcro side on top so the sticky side was out.  Then I lined up the colored piece and pressed it on.  This way, the Velcro pieces line up and the colored piece is in the right spot when it is attached.


Making sure the Velcro is lined up. 


I'm starting my class off with the states I have lived in to give them a head start at the beginning of the year. 


All the pieces are kept in a basket on the desk I have under the B.board.  The picture below shows the map on the board and the desk underneath.  Our class expectations will go on the wall to the right and the prize will be posted above the map. 


For the prizes, I do several things.  I sometimes make it a mystery and don't tell the students what it is until they win it.  This usually works best after students have had a few prizes so they know what types of things might be expected.  Often times, we choose as a class.  Tables work together to come up with one or two ideas, we share them out as a class and then vote on them.  My parameters are that they usually need to be free and something that can be done at school.  Some of the things we've done include:

Bring your own game - Students bring their own board games or cards games and play for about an hour one afternoon.
Bring your electronic device - Students can bring their electronic gaming systems or music devices to play/listen to.
Play Kickball - My students usually love kickball and enjoy having an afternoon out playing it.
Read in the Gym - Bring blankets and pillows and spread out all over the gym to read
Watch a movie - We are able to watch anything with a G rating or our media center also has a good selection of movies.  I usually try to tie this in with content or watching a movie based on a book we have read.
Extra recess - Adding in a morning recess one day.  We usually just have lunch time and a 15 minute afternoon recess.

Food Parties - I usually save the food parties for my mystery incentives:
     Root-beer Float Party
     Hot Chocolate and a Story or Movie Party
     Pizza Party
     Soda Pop or Popsicle Party (each child receives a can of Shasta soda or a Popsicle and consumes it outside)

**For any of the incentives, be sure to set parameters, especially when students are bringing items from home.**

What is your whole-class management/incentive system?

 photo Signature_edited-3_zps050aaea1.png

Tuesday, July 23, 2013

Bulletin Boards are Backed

I am loving the patriotic theme for my classroom.  I have my bulletin boards backed with some fun fabrics.  The big board along my back wall is my favorite, and I'm kind of wishing now that I'd done them all with that fabric.  Oh, well.  What's done is done and I've already spent a fortune on fabric!

Here's that fabulous back board and a close up of the fabric. 


This one is on the left of the white board.  It's a busy stripe with little stars between.  Didn't get a close up of that.  I'll do a post about the map later. 


This one is on the right of the white board:  

This one is obviously above my desk area and the next photo is a close up of the wavy stripes. 


I always feel like I'm more together when my boards are up, so that's usually the first thing I do.  

What is your classroom theme or do you have one?


 photo Signature_edited-3_zps050aaea1.png

Thursday, July 18, 2013

Organizing for Reading Groups

Have I told you lately that I love IKEA?  Actually, I don't remember mentioning that on my blog.  Well, I do love IKEA.  I am blessed to have one about 45 minutes away and just a few miles from my parents.  So, I have the opportunity to stop by quite often.

I love the Trofast storage systems.  I have it at my home for my children's toys and I used it in my first grade classroom to organize my math manipulatives.  You can see it in a post I did here.  It's there to the left of the listening center pocket chart.

I didn't need that much storage for math manipulatives in 5th grade, but knew I had to have a Trofast in my classroom.  Well, while perusing IKEA, I stumbled upon this little beauty:


I thought how perfect it would be to organize the books and notebooks and such for my guided reading groups.  So, it came home with me and here it is in my classroom.  I purchased 7 tubs and a package of shelves, they come 2 in a package.  I'm so excited to label each tub and get the caddy full of supplies.  This is going to be so nice to help me keep things organized.

How do you organize for your reading groups?


 photo Signature_edited-3_zps050aaea1.png

Tuesday, July 16, 2013

Starting Classroom Setup

Well, school doesn't start for me until August 19 when teachers begin their contracts.  However, all the 5th and 6th grade new teachers will be coming to visit my room the last week of July, so my room needs to be ready ASAP!!  I'm freaking out just a little bit so I headed back last week to get started on things.  Here are some pictures of when I walked in.  Since I'm coming back after a year as an instructional coach, I'm starting from the beginning again.

Entrance (You can see the magnetic board I used for my attendance board there, post coming)
Now going clockwise around my room: 

I came prepared, lunch is on the table. ;)
There's my cute Bow and Pockets bag from Dilly Dabbles Designs.


I didn't get the sink area in the corner there to the right, then it's back to the main door. 

I love that the last teacher left nothing behind except for the items purchased by the school for that 5th grade classroom.  She also asked me if I wanted some of the items on the walls, so she left the alphabet up for me and the cubby numbers (although now I'm going to change the cubby numbers).

My principal is wonderful.  Knowing that I needed to get going on my room, he asked my equally wonderful custodian to clean it quickly, and he did.  My school is only two years old, beginning its third year this fall, so it's a really great and updated room.

Check back every few days to see how it comes along.


 photo Signature_edited-3_zps050aaea1.png

LinkWithin

Related Posts Plugin for WordPress, Blogger...